Wow! It’s been a long time since I’ve blogged. Life has been pretty crazy; especially since I found out I was pregnant. Yep! That’s right. I am almost 27 weeks pregnant and having a baby boy. Pretty exciting! Babies are definitely on my mind, between being pregnant, my sister having a baby, and lots of friends expecting. All I can think about is all the fun, exciting activities you do leading up to having a baby; like decorating the baby nursery, baby showers, and pinning creative activities for a developing child.
It wasn’t too long ago that my sister Whitney and I planned my sister Brooke’s baby shower. I was in charge of creating a craft activity for the shower. I wanted something easy, mess-free, and an activity everyone would feel comfortable doing even if they weren’t “artistic”.
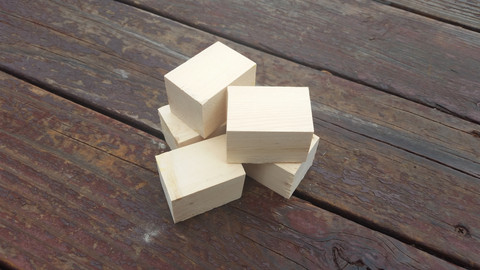
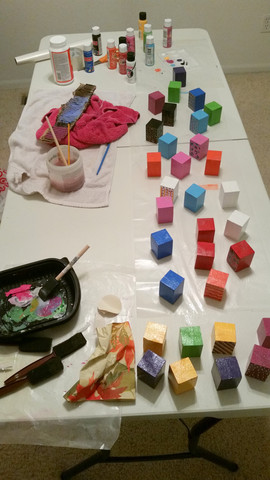
I decided on making wooden baby blocks from scratch rather than buying precut wooden blocks for a small fortune. I think the entire piece of wood at Home Depot cost me $1.97 while a pack of 4 wooden blocks at Hobby Lobby costs roughly $3.99. That’s crazy talk–$30 for only 28 blocks, no thank you! 🙂 Obviously, making blocks from scratch is a little more time consuming but when you have a nice gentleman at Home Depot cut the wood and your husband sand the blocks. The hard part is done. And the fun begins. Painting!

Here’s what you’ll need:
• 2 in. x 2 in. x 8 ft. lumber (from Home Depot)
• Power Sander or Sanding block
• Craft paint in a variety of colors (non-toxic)
• Paint brush
• Modge Podge Gloss finish
• Foam brush (for Modge Podge)
• Wax Paper
• 2-3 Plastic Plates
• Plastic cup for water
• Old rag
• Cute Bag to put blocks in when finished (I got mine at Hobby Lobby)
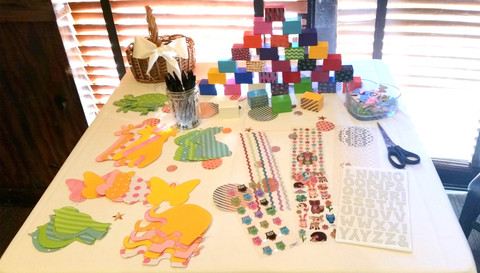
Embellishments for the blocks
• Alphabet stickers and/or number stickers
• Animal stickers
• Any cute stickers that are size appropriate for the blocks
• Permanent markers or Paint markers
Directions:
1. Go to Home Depot to get 2x2x8 lumber and get an employee to cut the wood into 2 inch pieces.
2. Kindly ask your hubby or a cute guy you know to power sand the rough edges of wood. You can also use a sanding block to smooth out rough edges. It will just take a little longer.
3. Quickly rinse the wood blocks to remove all the dust from sanding.
4. Let blocks dry.
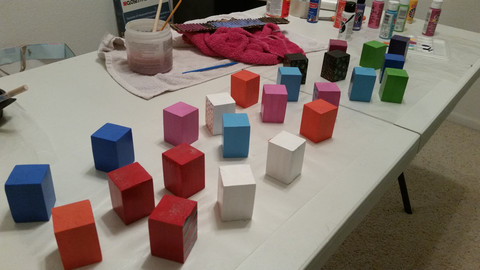
5. Now you are ready to paint! Lay down your wax paper and place blocks on top of paper. Use the plastic plate as your painter’s palette. I painted 1/2 the block to allow drying and then painted the other half. Apply 2-3 coats of paint. Use cup of water to rinse paint in between changing colors.
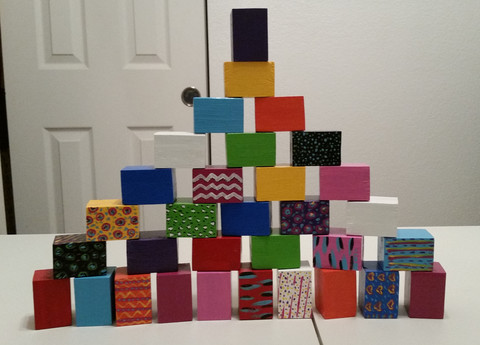
6. I made 33 blocks (I painted blocks in groups of three—3 red, 3 pink, 3 fuchsia, 3 purple, 3 dark blue, 3 light blue, 3 yellow, 3 orange, 3 green, 3 black, and 3 white.) You can make as many or as few wooden blocks as you’d like. Just make sure if you are doing the alphabet that you have at least 26 blocks.
7. I painted a decorative design on two sides of the blocks leaving the other sides blank. You can get as creative and decorative as you want. Or you can keep it simple and leave the blocks a solid color.
8. Once the paint is dry. Apply your Modge Podge using your foam brush and plastic plate as the glue palette. Paint ½ the block at a time to allow drying and then paint the other half. Apply 2 coats of the Modge Podge. The Gloss finish will give the blocks a nice shiny look and feel.
9. Let blocks dry. You can use hairdryer for faster drying.
Blocks are now ready for decorating. Use your assortment of stickers to embellish the baby blocks. Small children have a blast decorating blocks. So even if you aren’t doing these blocks for a baby shower activity, prep them for your little ones and let them decorate their own blocks!
Hope you enjoy and everyone loves the activity!